Test Driven Development with Enyo framework
posted in Testing, Enyo, Javascript

Enyo is Javascript frontend framework which we use at ZEF a lot. It emphasizes re-usable modular widgets named kinds for building the UI and its main targets are mobile platforms, however it is usable on conventional desktop web applications too.
There’s little information or examples about practices considering test driven development while using Enyo and I’m a little bit uncomfortable with the aproach which could be seen at the core Enyo repository, so I decided to create own setup using tools I like more and are quite popular with other open source projects.
Why test driven development?
I like TDD because it consistently builds up confidence in your codebase and makes refactoring and helps catching regressions after the test coverage is good enough.
Creating test code before actual implementation has also a nice side effect which shapes your application/library to contain more natural feeling interfaces, because you actually try to use them from your tests before they even exist.
Of course it demands extra work and discipline to create tests and keep them up to date, but I feel that the rewards of the TDD are well worth the effort.
Basic setup
There are great number of different Javascript based unit test frameworks. I chose QUnit because of it has clean and simple API and nice way of testing asynchronous callbacks.
GruntJS is similar to the Rake in the Ruby ecosystem or Make in the traditional C programmer’s toolchain and it handles running test tasks when test or implementation files change or it is invoked from the command line.
Jordan Kasper’s blog has a good post covering setting up grunt and QUnit for testing jQuery plugins and I used that approach as starting point to include Enyo specific changes.
For this setup you need to have Node.js and NPM installed. Those are required only during development time and it doesn’t really matter if your actual app won’t have anything to do with Node. Those could be installed from Node.js site or from your systems package repositories. I mainly use Fedora which has them pre-packaged and available through Yum:
$ sudo yum install nodejs npm
Example Enyo based project displaying this test setup is available at my Github repositories. That example is adapted and modified from the Enyo bootplate template.
Setting up Grunt
Following package.json will have the minimal content required for installing Grunt tasks and Qunit that is all what you need if you are not developing Node app.
{
  "name": "Your-project-name",
  "version": "1.0.0",
  "devDependencies": {
	"grunt": "~0.4.1",
	"grunt-contrib-qunit": ">=0.2.1",
	"grunt-contrib-watch": ">=0.3.1",
	"qunitjs": "~1.12.0"
  }
}
You have to install grunt-cli package globally to be able to use grunt with your project, but all other dependencies are installed automatically by npm with the help of package.json above.
Install grunt-cli globally:
$ sudo npm install -g grunt-cli
Install other packages, by running following in the directory containing package.json:
$ npm install
Packages are installed under node_modules directory and it’s good idea to include that in your .gitignore file to prevent cluttering your repository or git status output.
Grunt tasks are defined in Gruntfile.js shown below. Grunt-contrib-qunit and grunt-contrib-watch packages will handle all the heavy lifting related to those tasks and Gruntfile.js includes only configuration for them and loading of those tasks.
module.exports = function(grunt) {
  grunt.initConfig({
    pkg: grunt.file.readJSON("package.json"),
    // Set qunit test files
    qunit: {
      all: ["tests/*.html"]
    },
    // Set files which are watched and define task which is
    // run after changes
    watch: {
      files: ["tests/*.js", "tests/*.html", "source/**/*.js"],
      tasks: ["qunit"]
    }
  });
  // load up your plugins
  grunt.loadNpmTasks("grunt-contrib-qunit");
  grunt.loadNpmTasks("grunt-contrib-watch");
  // register qunit test run as default task
  grunt.registerTask("default", ["qunit"]);
};
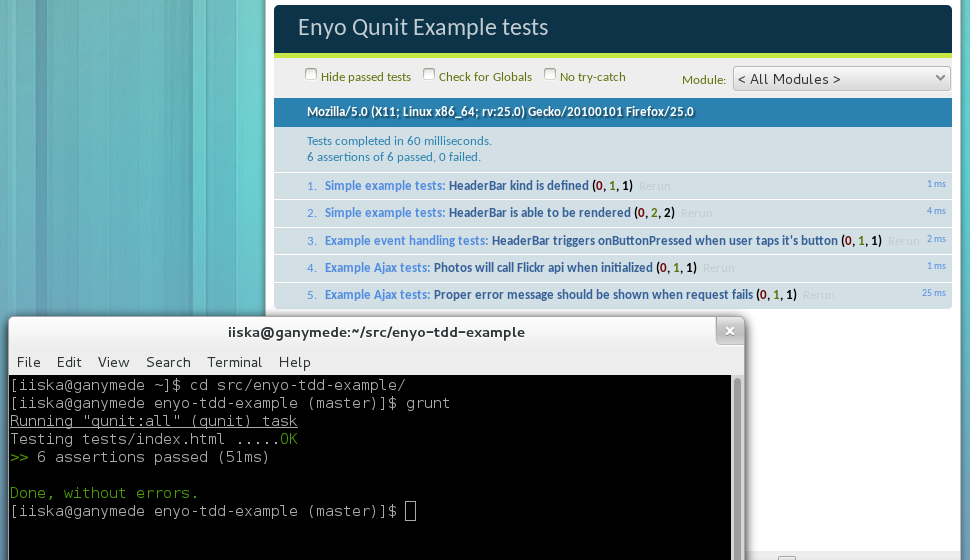
Now command grunt qunit will run the tests and grunt watch will start watcher process which runs tests automatically when changes are detected.
Basic test setup with Enyo libraries
QUnit tests are run by a browser which in this case is headless PhantomJS browser run by Grunt task, but it is possible to open test files in regular browser too.
Tests are defined by using at least one html file and as many js files containing test modules as you need. Tests for Enyo apps will need html done in following fashion.
<!DOCTYPE html>
<html>
  <head>
    <meta charset="UTF-8" />
    <meta http-equiv="content-type" content="text/html; charset=utf-8" />

    <title>Enyo Qunit Example tests</title>

    <link rel="stylesheet" href="../node_modules/qunitjs/qunit/qunit.css" />

    <!-- 1. include Enyo and other external libraries which are required by your app -->
    <script src="../enyo/enyo.js" type="text/javascript"></script>

    <!-- 2. include actual JS files of your application -->
    <script src="../source/package.js" type="text/javascript"></script>

    <!-- 3. include QUnit test framework -->
    <script src="../node_modules/qunitjs/qunit/qunit.js"></script>

    <!-- 4. actual tests -->
    <script src="example_tests.js"></script>
  </head>
  <body>
    <div id="qunit"></div>
    <!-- QUnit will use this for test results -->
    <div id="qunit-fixture">
      <!-- Render content which is relevant for your tests here -->
      <!-- Content of #qunit-fixture is reseted before each test -->
    </div>
  </body>
</html>
Above HTML file loads your app’s dependencies, your actual app, QUnit test framework and runs included tests. Element #qunit is required for the QUnit tests results and #qunit-fixture will be used for rendering your app components which are under testing. Note that #qunit-fixture will be cleared before each test.
Actual test code is shown in the following snippet. There is a couple simple test cases where the first only asserts that component under test is really available and the second one makes sure that it could be rendered properly. Element #qunit-fixture is used as a rendering target.
module("Simple example tests");

test("HeaderBar kind is defined", function() {
  ok(HeaderBar);
});

test("HeaderBar is able to be rendered", function() {
  var node = document.getElementById("qunit-fixture");
  var bar = new HeaderBar().renderInto(node);

  ok(bar);
  ok(bar.hasNode());
});
Capturing Enyo events in tests
Testing that planned events trigger properly and do what they should is important step in testing and capturing events during tests is required. We need to add a little extra test code to handle events in the Enyo way.
Here’s the actual component which we are testing:
enyo.kind({
  name: "HeaderBar",
  kind: "onyx.Toolbar",

  events: {
    onButtonPressed: ""
  },

  components: [
    { name: "title", content: "Example Flickr photo listing" },
    {
      name: "button",
      kind: "onyx.Button",
      content: "Press this!",
      ontap: "handleButton"
    }
  ],

  handleButton: function(inSender, inEvent) {
    this.doButtonPressed({ button: 1 });
  }
});
For capturing custom events I use another kind specified only for test purposes, which will register event handlers. Those handlers will do the assertions to check that all was triggered properly.
Test code will also handle the triggering of the event like shown in the following snippet.
module("Example event handling tests");

test("HeaderBar triggers onButtonPressed when user taps it's button", function() {
  // Helper kind for catching events
  enyo.kind({
    name: "TestKind",
    kind: enyo.Control,

    components: [
      { name: "bar", kind: "HeaderBar", onButtonPressed: "handleEvent" }
    ],

    handleEvent: function(inSender, inEvent) {
      // Event is fired and bar component has provided data with it
      // that contains element named button with value 1
      equal(inEvent.button, 1);
    }
  });

  var node = document.getElementById("qunit-fixture");
  var obj = new TestKind().renderInto(node);

  // Trigger ontap from button
  obj.$.bar.$.button.bubble("ontap");
});
Mocking Ajax
Web application usually depend on other web services but testing single component should be independent from other services, because you wouldn’t know if the failure is caused by the bug in you component or error in the other service. Simulating failure handling is also easier if you aren’t testing against the actual service.
Using mock objects and method stubs is common way to decouple tested component from external dependencies. For stubbing requests triggered from Enyo’s WebService, Jsonp and Ajax kinds overriding go method in the related request kind is simple way to achieve this with Enyo 2.2.0. However this won’t work in upcoming 2.3.0 so I have to find new or modified aproach for that.
For time being following test setup is enough for Enyo 2.2.0 apps.
module("Example Ajax tests");

test("Photos will call Flickr api when initialized", function() {
  enyo.JsonpRequest.prototype.go = function test() {
    ok(this.url.match(/^https?:\/\/api.flickr.com/));
  };

  var node = document.getElementById("qunit-fixture");
  var p = new Photos().renderInto(node).render();
});

asyncTest(
  "Proper error message should be shown when request fails",
  function() {
    enyo.JsonpRequest.prototype.go = function test() {
      this.fail();
    };

    var node = document.getElementById("qunit-fixture");
    var p = new Photos().renderInto(node).render();

    setTimeout(function() {
      ok(p.$.error.getContent().match(/Unable to load/));
      start();
    }, 10);
  }
);
And this is the componen under test:
enyo.kind({
  name: "Photos",
  kind: enyo.Control,

  create: function() {
    this.inherited(arguments);

    new enyo.JsonpRequest({
      url: "http://api.flickr.com/services/feeds/photos_public.gne",
      callbackName: "jsoncallback"
    })
      .response(enyo.bind(this, "renderPhotos"))
      .error(enyo.bind(this, "renderError"))
      .go({
        id: "72148715@N00",
        per_page: 10,
        lang: "en-us",
        format: "json"
      });
  },

  renderPhotos: function(inSender, inResponse) {
    this.destroyClientControls();

    enyo.forEach(
      inResponse.items,
      function(item) {
        this.createComponent({
          tag: "img",
          attributes: {
            src: item.media.m,
            title: item.title
          }
        });
      },
      this
    );

    this.render();
  },

  renderError: function() {
    this.destroyClientControls();
    this.createComponent({
      name: "error",
      content: "Unable to load photo listing..."
    });
    this.render();
  }
});
I really like using Webmock gem while coding in Ruby when I need to do similar mocks so finding or developing something like that would be ideal for me. And of course I have to find some kind of solution for handling mocking requests similar fashion in Enyo 2.3.0.
If you have some ideas on testing Ajax requests in 2.3.0 or other tips how to improve my overall testing aproach please leave a comment.